Vernier Caliper
Least count
smallest possible measuring that can be
measured accurately using given instrument is called least count of instrument.
method to find least count of simple scale-
Range of instrument
Range is minimum to maximum possible measurement of a given instrument.
In fig above
Range = 0.1 cm to 15 cm (for example-i)
Similarly Range = 0.0625 inch to 6 inch (for example-ii)
Range = 0.1 cm to 15 cm (for example-i)
Similarly Range = 0.0625 inch to 6 inch (for example-ii)
Vernier Caliper
It is the instrument used for measuring
length, internal-external diameter, depth, thickness & height of a tube or tube like structure. It consist of a main scale & vernier scale. Invented by Pierre Vernier in 1631. Using a simple scale we can accurately measure up-to one digit of decimal but using vernier caliper we can measure accurately up-to second digit of decimal.
Least count of vernier scale
L.C = 1 M.S.D - 1 V.S.D
where M.S.D - main scale division
& V.S.D - vernier scale division
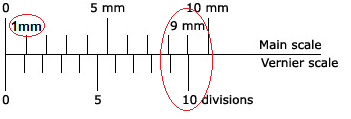
Generally (more than 95% cases) 1 M.S.D = 0.1 cm or 1 mm as shown in fig below which we can easily read on main scale of vernier caliper.
But there is no way to read the value of 1 V.S.D; so we can calculate it with respect to the main scale.
Generally (more than 95% cases) 10 divisions of vernier scale is equal to the nine divisions of main scale as shown in fig above. For calculation purpose let "n" divisions of vernier scale is equal to the "m" divisions of main scale.
Zero error
It is an error due to non-coincidence of zero of main
scale with zero of vernier scale when the jaws are closed.
It has two types -
(i) positive zero error - When zero of the vernier scale is on right side of the zero of main scale then the error is said to be positive zero error.
(ii) negative zero error - When zero of the vernier scale is on left side of the zero of main scale then the error is said to be negative zero error.
Taking a measurement
1. First find whether there's an error on the caliper.
2. Second find its least count (L.C).
3. Place the object between the appropriate jaws (outer/inner) or on the depth rod according to the measurement.

4. The reading of the main scale is; digit on the left side of, zero of the vernier scale. This is main scale reading(M.S.R).
5. Now look up for the number of divisions on the vernier scale which exactly coincides with any of the main scale reading. This is the Vernier Scale Reading(V.S.R).
6. The length of the object is calculated using the formula:
Length = M.S.R + (V.S.R x L.C)
7. If there's an error in the caliper add or subtract depending on the type (positive error or negative error).
Corrected reading
For correct reading we eliminate the error using the formula
corrected reading = Total reading + Zero error
Example (i) an instrument has 0.2 positive zero error and total reading is 9.2 cm
then correct reading = 9.2 cm + (+0.2)
= 9.4 cm
(ii) an instrument has 0.3 negative zero error and total reading is 9.2 cm
then correct reading = 9.2 cm + (-0.3)
= 8.9 cm


Comments
Post a Comment